Straight answer: On steep, rough descents, the downhill mountain bike is the better trail bike. On soft, loose or wet ground, the fat mountain bike is the better trail bike. For most riders on ordinary mixed trails, the fat bike is the easier bike to live with — the downhill bike only earns its keep when the trail points down.
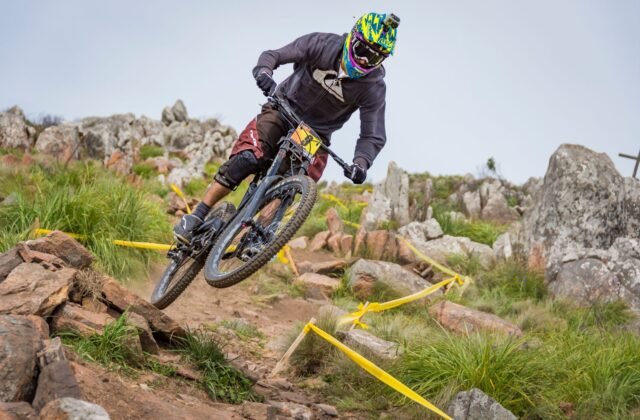
That split is the whole story. A downhill bike’s long-travel suspension — around 200 mm front and rear — and slack geometry are built for speed on rough descents. A fat bike’s 3.8–5.0 in tyres, run as low as 5–10 psi, are built to float over sand, snow and mud. Neither is a good climber, and neither is a good all-rounder — so match the bike to the worst ground on your home loop, not the best.
A downhill mountain bike has one job: to go down steep, rough ground fast. A fat mountain bike has the opposite job: to stay on top of soft ground that swallows normal tyres. Both are mountain bikes, but they solve different problems, so the downhill mountain bike vs fat mountain bike question depends entirely on what your trails look like.
Most trail networks are neither a bike-park downhill course nor a beach. They are a mix of climbs, flat singletrack, roots and the odd steep chute, which is why so many riders buy the wrong one — they pick the downhill bike after one lift-served day, or the fat bike after one snowy ride. For the gentler side, see Trail Mountain Bike vs Fat Mountain Bike: Which Is Better for Trails?, and for the downhill side, Downhill Mountain Bike vs Enduro Mountain Bike: Which Is Better for Beginners?.
This comparison puts the two side by side — suspension, tyres, weight, climbing, braking and upkeep — and ends with a 10-minute test to run on your own trails before you spend anything. For the wider picture, the Mountain Bikes Hub collects the full set of mountain bike comparisons.
Downhill Mountain Bike vs Fat Mountain Bike: The Core Differences
The two bikes look alike at a glance — two wheels, knobbly tyres, flat bars — but every part is tuned for a different kind of ground.
| Attribute | Downhill Mountain Bike | Fat Mountain Bike | What to Watch |
|---|---|---|---|
| Suspension travel | Around 200 mm front and rear | Usually rigid, or a short fork; the tyre is the suspension | Travel helps only on rough descents |
| Tyres | 2.4–2.6 in wide, 25–30 psi, for grip on hard dirt | 3.8–5.0 in wide, 5–10 psi, to float on soft ground | A hard fat tyre loses its advantage |
| Weight | Heavy — strong frame, big fork, wide bars | Heavy too — wide rims, tyres and frame | Neither is a light climber |
| Climbing | Slow and tiring; a slack seat angle fights you uphill | Slow but steady; low pressure grips loose climbs | Both punish on long climbs |
| Descending | Stable at speed; slack head angle, long wheelbase | Nervous at speed on hard ground; wide tyres steer slowly | It grows with the slope |
| Braking | Large rotors and strong calipers for steep descents | Smaller rotors; the fat tyre adds braking grip | It can out-brake on loose descents |
| Best ground | Steep, rocky, rooty descents and bike parks | Sand, snow, mud and loose gravel | Match it to your worst ground |
| Upkeep | Suspension servicing; pivots and pads wear fast | Tyres, rims and sealant; check low pressures often | Service the suspension every season |
The short version: the downhill bike spends its weight on suspension and brakes, and the fat bike spends its weight on tyres and rims.

HOVERFLY OUREA 26 inch Electric Bike for Adults
750W peak motor, up to 20 MPH and 40 miles per charge.
When the Answer Changes
Five variables flip the verdict — and your loop probably has more than one of them.
- Slope: on steep descents the downhill bike wins by a wide margin. On flat or rolling trails its suspension feels dead and its weight drags.
- Surface: sand, snow, deep mud or loose gravel flip the verdict to the fat bike — a downhill bike’s narrower tyres dig in and stall.
- Weather: after rain, wet roots and greasy rock change the grip balance. The fat bike grips wet roots better, and a few psi of air pressure can change it completely.
- Rider: a beginner feels safer on a fat bike — slower, more stable, more forgiving. A confident rider on steep ground gets more from a downhill bike.
- The climb: if your trails are mostly uphill, neither is the right tool — a light trail bike climbs better than both.
The 10-Minute Trail Test: Downhill or Fat?
Ride the same loop on both bikes — one steep descent, one loose flat section, one short climb — and score what happens.
- Ride the loop once at a comfortable pace on each bike and note the time for each section.
- On the descent, count your hard brake grabs. Fewer grabs mean the bike fits the slope.
- On the loose section, watch the front wheel — if it wanders and fights you, the bike is wrong for that surface.
- On the climb, note your gear and effort. The same speed for a bigger effort is a warning sign.
- Ride the descent again, faster. Faster and calmer means the bike fits; faster and more scared means it does not.
What a Fail Looks Like
| Symptom | Cause | Fix |
|---|---|---|
| Front wheel digs in on sand or mud | Tyres too narrow, or pressure too high | Drop to 6–8 psi |
| Hands ache on roots | Suspension too stiff, or none | Soften the fork |
| You walk the steep chute | Geometry too steep, or brakes too weak | A slacker bike with bigger rotors |
| The bike feels dead on flat singletrack | Too much travel, or too much tyre | A lighter trail bike suits this loop |
Myth vs fact: “A downhill bike is the best trail bike because it has the most suspension.” Fact: suspension helps on rough descents only. On flat and climbing trails the extra travel and weight slow you down.
Myth vs fact: “Fat bikes are only for snow.” Fact: their real advantage is any soft surface — sand, mud and loose gravel — and they grip wet roots better too.
⚠️Before you test: wear a helmet and gloves, check your brakes and tyre pressure, and ride a trail you already know. Never test a new bike on a descent you have not walked.
⚠️ Warning: never test a new bike at full speed on a trail you have not ridden.
Learn the trail at walking pace, then ride it slowly. If anything feels wrong, stop.

Tamobyke V20 4.0 Electric Bike
1500W motor, 48V 15Ah battery, 20 x 4.0 fat tyres, throttle and pedal assist for steep starts.
The Method: How to Set Each Bike Up for Trails
Two bikes set up badly will tell you nothing. Set both up the same way first.
What You Will Need
- A floor pump with a low-pressure gauge
- A shock pump
- A multi-tool
- A tape measure, for equal saddle height
- Your helmet and gloves
- The same test loop for both bikes
The Method
- Set the downhill bike’s sag to about 30% front and rear, and the fat bike’s tyres to 8–10 psi.
- Set the saddle height the same on both bikes.
- Bed in the brakes with ten firm stops from walking speed.
- Ride the loop at a comfortable pace, then again at your normal pace.
- Check tyre pressure after the first lap — a 2 psi change changes the ride.
- Write down one line per bike: what was good, and what was bad.
Note: tyre pressure is the cheapest adjustment you can make. On a fat bike, dropping from 15 psi to 8 psi changes the bike completely — more grip, more comfort, a wider line through loose ground.
When the Damage Is Already Done
If you already bought the wrong one, you do not have to sell it on the first day.
- You bought a downhill bike and your trails are flat: fit a faster-rolling rear tyre, lock the suspension on climbs, and save it for bike-park days.
- You bought a fat bike and your trails are steep and rocky: add a suspension fork if the frame fits one, and fit the narrowest tyres your rims allow.
- Either bike feels wrong on climbs: fit lighter wheels, or use it as a second bike.
- You overspent: a used trail bike often costs less than the service and tyres a mismatched bike needs.

26 inch Electric E Bike for Adults
26-inch hybrid-style e-bike with a 500W brushless motor, 20 MPH top speed, and up to 37 miles pedal-assist range.
The Safe Alternative: Start with the Fat Bike
If you are not sure which side wins on your trails, the fat bike is the safer first buy — slower, more forgiving, and useful on more kinds of ground.
- Buy it if your trails are soft, loose or wet.
- Run 8–10 psi on dirt trails, and 5–6 psi on sand or snow.
- Ride it for a month on your home loop before changing anything.
- If steep descents become routine, rent a downhill bike first.
- Keep it for winter and soft days.
The fat bike covers the most ground for the least risk.
What to Do Next, in Order
- Walk your loop and note its steepest descent and longest climb.
- Rent or borrow both bikes for one ride each on that loop.
- Run the test and write down what failed.
- Choose the bike that matches the worst section of your loop.
- Buy it, then spend your first month tuning pressure and suspension.
Never Do This
- Never ride a downhill bike down a trail you have not walked — speed hides rocks and drops.
- Never inflate fat tyres to road-bike pressure — the float disappears.
- Never skip the brake check before a descent — a missed squeal can be a worn-out pad.
- Never buy either bike for a single day’s conditions — buy for the trails you ride every week.
- Never ride either bike without a helmet — both are built for ground you can fall on.
In Short
A downhill mountain bike is the better trail bike when the trail points down steeply and the ground is rough. A fat mountain bike is the better trail bike when the ground is soft, loose or wet. On ordinary mixed trails the fat bike is the easier bike to live with — and the safer first buy if you are not sure.
The Essentials
- Downhill wins steep, rough descents; fat wins soft, loose ground.
- Fat tyres of 3.8–5.0 in at 5–10 psi float where narrower tyres sink.
- Both bikes are heavy, and both punish you on climbs.
- Tyre pressure matters more than travel.
- Test both bikes on your own loop.
- If in doubt, start with the fat bike.
More Questions, Answered
Can you ride a downhill bike on normal trails?
Yes, but it is slow and heavy on climbs and flat sections. It is happiest pointing down a steep, rough trail or in a bike park.
Can you ride a fat bike on steep trails?
Yes on loose, steep ground. On hard, rocky descents its steering is slow and its brakes smaller, so a downhill bike is safer there.
Which bike is better for beginners?
The fat bike — slower, more stable, more forgiving. A downhill bike demands more skill.
Which bike is better in snow or sand?
The fat bike — its wide tyres float on soft ground, while a downhill bike’s narrower tyres dig in.
Can one bike do both jobs?
Not really. A long-travel trail bike comes closest, but it still sinks on sand and snow.
Additional Details
Name: Downhill Mountain Bike vs Fat Mountain Bike: Which Is Better for Trails?
Description: Downhill mountain bike vs fat mountain bike: compare travel, tyres, weight and climbing to see which bike wins on steep descents, sand, snow and mud. Read on.
Published: November 10, 2026